1
/
of
5
The Frugal Fixer
O-Ring Fiat Jeep Dodge 1.4L Turbo Oil Separator PCV ORing Cover Seal Improved
O-Ring Fiat Jeep Dodge 1.4L Turbo Oil Separator PCV ORing Cover Seal Improved
Regular price
$8.99 USD
Regular price
Sale price
$8.99 USD
Quantity
Couldn't load pickup availability
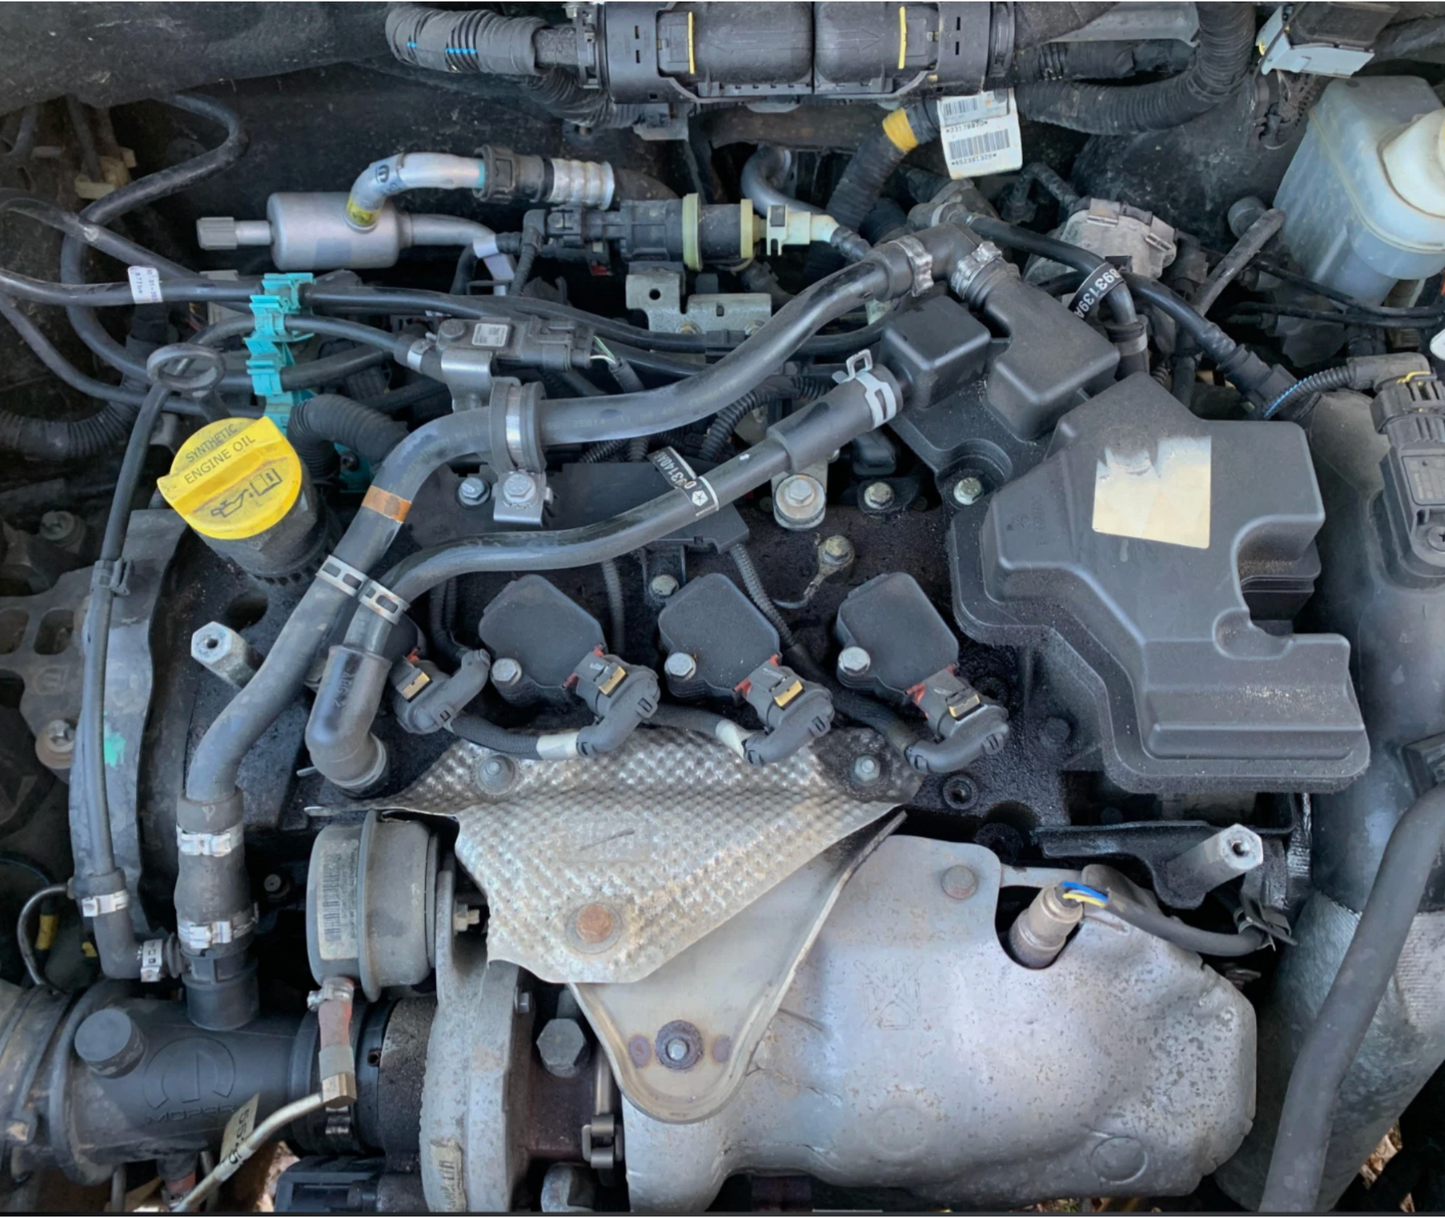
Replacing the O-ring cover seal for the air/oil separator (AOS) and PCV valve on a Fiat 500 Abarth with a 1.4L Turbo engine is a straightforward task that addresses common oil leaks, particularly around cylinders 3 and 4, which can lead to misfires or reduced performance. This guide applies to the Fiat 500 Abarth (2012-2019) and similar 1.4L MultiAir Turbo models (e.g., Fiat 500L, 500X, 124 Spider, Jeep Renegade, Dodge Dart). The O-ring often degrades over time, causing oil seepage, and should be serviced every 30,000 miles or if leaks are detected.
Tools and Materials Needed
- O-Ring Seal: Mopar part #04893446AB (improved, rounded design) or high-quality Viton O-ring
- Tools: 10mm socket/wrench, 23mm socket (for PCV valve), flathead screwdriver, pliers (for hose clamps), torque wrench.
- Cleaning Supplies: Brake cleaner or degreaser, clean rags, spray cleaner for AOS.
- Other: 15.3-18.5mm hose clamp (if replacing), jack and jack stands (if accessing from below), gloves, safety glasses.
- Replacement Fluid: 5W-40 synthetic oil (if topping off due to leaks).
Step-by-Step Replacement Guide
- Safety Precautions
- Park the vehicle on a flat surface, engage the parking brake, and disconnect the negative battery terminal to avoid electrical issues.
- Work on a cold engine to prevent burns.
- Wear gloves and safety glasses to protect against oil and debris.
- Locate the Air/Oil Separator (AOS)
- The AOS is a black box mounted on the valve cover, near the turbo and spark plugs, connected by hoses to the PCV system.
- Refer to a service manual or YouTube videos (e.g., “Fiat 500 Abarth Oil Separator Replacement”) for precise location.
- Prepare the Work Area
- Place a drain pan under the engine to catch any oil drips.
- Clean the AOS and valve cover area with degreaser to prevent contamination.
- Remove the AOS
- Disconnect the hoses attached to the AOS:
- Loosen the hose clamps (15.3-18.5mm) using pliers or a screwdriver. Note the crimp clamp may need careful removal or replacement with a standard clamp.
- Detach the hose with the blue clip (if present) using pincers or a flathead screwdriver.
- Remove the three 10mm bolts securing the AOS to the valve cover.
- Gently pull the AOS upward to detach it. Note the oil return tube at the bottom, which may require wiggling to free. Avoid forcing it to prevent damage.
- Replace the O-Ring Seal
- Locate the O-ring on the AOS where it seals against the valve cover or crankcase breather “nipple.” It’s a common leak point, often causing oil to seep onto the valve cover or spark plugs.
- Carefully remove the old O-ring using a flathead screwdriver or pick, avoiding damage to the sealing surface.
- Clean the O-ring groove and mating surfaces with brake cleaner and rags to remove oil and debris.
- Install the new O-ring. Lightly lubricate with clean 5W-40 oil to ensure a proper seal and prevent twisting.
- Optional: Replace or Clean the PCV Valve
- If replacing the PCV valve, use a 23mm socket to unscrew the old valve from the AOS.
- Check the old PCV valve by shaking it; it should rattle freely. If stuck, replace it with Mopar #4893073AA or Duralast PCV1010DL.
- Clean the AOS interior with spray cleaner (e.g., brake cleaner) to remove oil gunk, which can affect performance and fuel economy. Dry thoroughly.
- Reinstall the AOS
- Reattach the AOS to the valve cover, ensuring the new O-ring is properly seated.
- Tighten the three 10mm bolts to the manufacturer’s torque specs (consult a service manual, typically ~8-10 Nm).
- Reconnect the hoses, securing them with clamps. If the original crimp clamp was damaged, use a new 15.3-18.5mm clamp.
- Ensure the oil return tube is properly aligned and snug (no pressure is applied, so clamps are optional).
- Check and Top Off Oil
- Check the engine oil level on the dipstick after a 5-minute rest. Add 5W-40 synthetic oil if low due to prior leaks.
- Inspect spark plug wells (especially cylinders 3 and 4) for oil contamination, which could cause misfires. Clean or replace plugs if needed.
- Test the System
- Reconnect the battery and start the engine.
- Check for oil leaks around the AOS and valve cover. Smell for burning oil, which may indicate a poor seal.
- Drive the vehicle and monitor for smooth operation, improved fuel economy (e.g., 27-30 MPG average), and absence of misfires or “bucking” during acceleration.
- Final Checks
- Recheck oil levels after a short drive and top off if necessary.
- Monitor the valve cover and spark plug area for recurring leaks over the next few days.
- Dispose of old oil and rags properly.
Tips and Warnings
- Use Viton O-Rings: Viton is heat- and oil-resistant, unlike the stock nitrile O-ring, which degrades faster. The Mopar #04893446AB is an improved, rounded design.
- Service Interval: Perform this maintenance every 30,000 miles or if oil is found on the valve cover or spark plugs.
- PCV Valve Check: A stuck PCV valve can increase oil consumption or cause blowby. Replace it if it doesn’t rattle.
- Oil Leaks and Misfires: Leaking O-rings can fill spark plug wells, causing misfires. Check coils and plugs if you notice performance issues.
- Cost Savings: O-rings cost a few bucks, and PCV valves are $12.50, much cheaper than a new AOS ($236).
- Video Guidance: Watch tutorials like “Fiat 500 Abarth Oil Separator Replacement” on YouTube for visual steps.
Troubleshooting
- Persistent Leaks: Ensure the O-ring is properly seated and surfaces are clean. Check hoses for cracks or loose clamps.
- Poor Performance: A clogged AOS or stuck PCV valve can cause bucking or low MPG. Clean the AOS thoroughly or replace the valve.
- Burning Oil Smell: Indicates a leak onto hot engine components. Recheck the O-ring and hose connections.
- Misfires: Oil in spark plug wells (cylinders 3/4) suggests a failed O-ring. Clean wells and replace plugs/coils if damaged.
Share