The Frugal Fixer
2011-2017 Nissan Quest EHPS Power Steering Pump O-Ring Repair Kit Improved
2011-2017 Nissan Quest EHPS Power Steering Pump O-Ring Repair Kit Improved
Couldn't load pickup availability
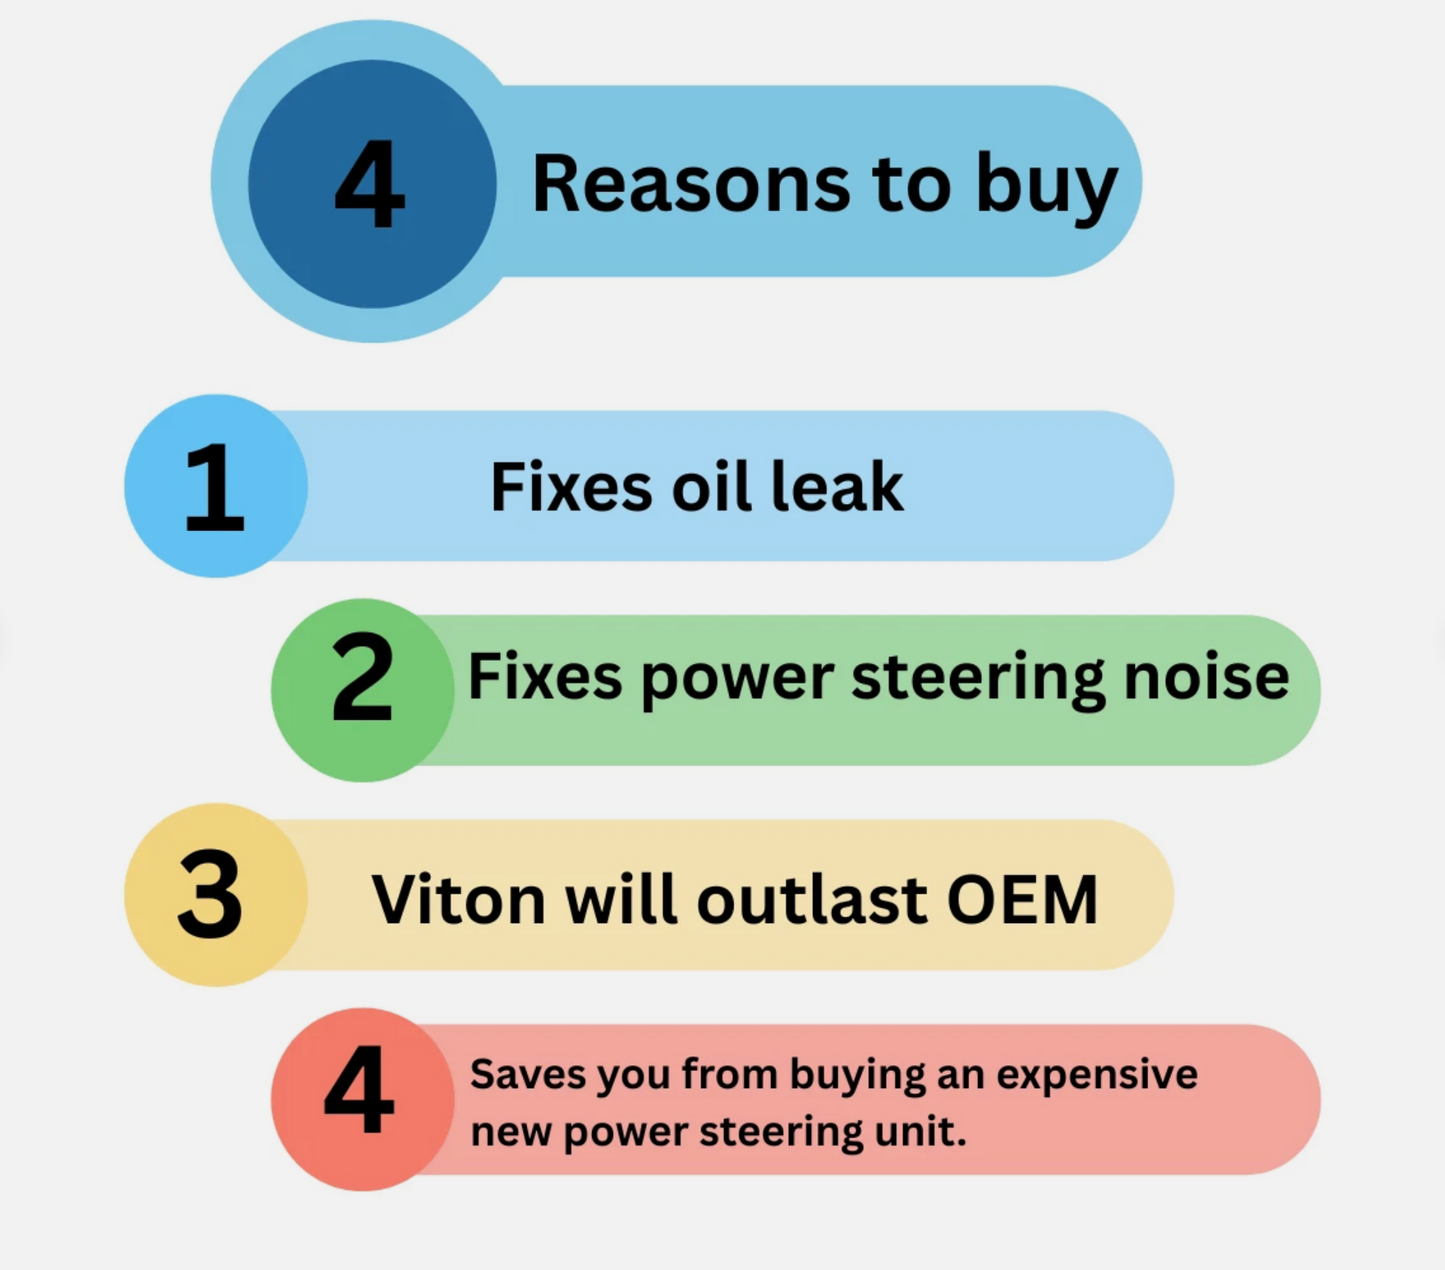
The EHPS power steering pump in a 2011-2017 Nissan Quest may develop leaks due to a worn or damaged O-ring, leading to low fluid levels and poor steering performance. Replacing the O-ring requires careful disassembly, inspection, and reassembly to ensure a proper seal. This guide outlines the steps to replace the O-ring on the EHPS pump.
Tools and Materials Needed
- Replacement O-ring
- Power steering fluid (Nissan PSF or equivalent)
- Socket set (metric, including 10mm and 12mm)
- Wrenches (metric)
- Screwdrivers (flathead and Phillips)
- Torque wrench
- Clean rags
- Drain pan
- Pliers
- Jack and jack stands or ramps
- Safety gloves and glasses
Safety Precautions
- Work in a well-ventilated area on a level surface.
- Ensure the vehicle is securely supported on jack stands or ramps.
- Disconnect the battery to prevent electrical issues, as the EHPS pump is electro-hydraulic.
- Allow the vehicle to cool down to avoid burns from hot components.
Step-by-Step Instructions
1. Prepare the Vehicle
- Park the vehicle on a flat surface and engage the parking brake.
- Disconnect the negative battery terminal to prevent electrical shorts.
- Raise the front of the vehicle using a jack and secure it with jack stands or use ramps for access to the undercarriage.
2. Locate the EHPS Power Steering Pump
- The EHPS pump is typically located on the passenger side of the engine bay, near the front of the vehicle.
- Identify the pump by its electrical connector and hydraulic lines. It’s mounted to the engine block or a bracket.
3. Drain the Power Steering Fluid
- Place a drain pan under the pump to catch fluid.
- Disconnect the low-pressure return hose from the pump (use pliers to loosen the clamp if needed) and allow the fluid to drain into the pan.
- Plug the hose temporarily to prevent debris from entering.
4. Remove the Pump
- Disconnect the electrical connector from the EHPS pump by pressing the release tab and pulling it off.
- Remove the high-pressure line from the pump using a wrench (usually 12mm or 14mm). Be prepared for minor fluid spillage.
- Unbolt the pump from its mounting bracket (typically 2-3 bolts, 10mm or 12mm). Keep track of bolt locations.
- Carefully remove the pump from the vehicle, ensuring no damage to surrounding components.
5. Disassemble the Pump to Access the O-Ring
- Clean the pump exterior with a rag to prevent contamination.
- Identify the O-ring location, typically at the interface between the pump body and the high-pressure outlet or reservoir connection.
- Remove the bolts or screws securing the pump’s cover or fitting (refer to the service manual for exact location).
- Gently pry off the cover or fitting to expose the O-ring. Note the O-ring’s position and orientation.
6. Replace the O-Ring
- Carefully remove the old O-ring using a flathead screwdriver or plastic pick to avoid scratching the sealing surfaces.
- Inspect the O-ring groove and sealing surfaces for debris, corrosion, or damage. Clean with a lint-free cloth.
- Install the new O-ring, ensuring it seats properly in the groove. Avoid twisting or stretching the O-ring.
- Lubricate the new O-ring lightly with power steering fluid to ease installation and ensure a good seal.
7. Reassemble the Pump
- Reattach the cover or fitting, ensuring proper alignment.
- Tighten bolts or screws to the manufacturer’s specified torque (check the service manual, typically 5-10 Nm for small fittings).
- Double-check that the O-ring remains seated during reassembly.
8. Reinstall the Pump
- Position the pump back onto its mounting bracket and secure it with the original bolts, tightening to the specified torque (typically 20-30 Nm).
- Reconnect the high-pressure line, ensuring a snug fit to prevent leaks.
- Reattach the low-pressure return hose and secure the clamp.
- Reconnect the electrical connector, ensuring it clicks into place.
9. Refill and Bleed the Power Steering System
- Fill the power steering reservoir with Nissan PSF or equivalent fluid to the recommended level.
- Reconnect the battery.
- Start the engine and slowly turn the steering wheel lock-to-lock several times to bleed air from the system.
- Check the fluid level and top off as needed. Inspect for leaks around the pump and connections.
10. Test and Verify
- Lower the vehicle from the jack stands or ramps.
- Test-drive the vehicle at low speeds to ensure smooth steering operation.
- Recheck for leaks after driving and adjust fluid levels if necessary.
Tips
- Use only OEM or high-quality replacement O-rings to ensure proper fit and durability.
- If the O-ring continues to leak after replacement, inspect the pump’s sealing surfaces for damage or wear, which may require pump replacement.
- Dispose of used power steering fluid responsibly at a recycling center.
Warnings
- Do not overtighten bolts, as this can damage the pump housing or strip threads.
• • Ensure no dirt or debris enters the power steering system, as this can cause pump failure.
Share